

The Review Collection module lets visitors submit written or video reviews through your website. Submitted reviews are saved as Pending Review, so you can check them before publishing.
Step 1: Create your page
In your WordPress dashboard, go to Pages → Add New.
Give the page a name, such as Leave a Review, then open it in the Divi Visual Builder.
You can build the page yourself or use a review collection Starter Layout.
Step 2: Add the Review Collection module
Add a section and row, then insert the Review Collection module.
If you imported a Starter Layout containing this module, open its settings instead.
Step 3: Choose your review methods
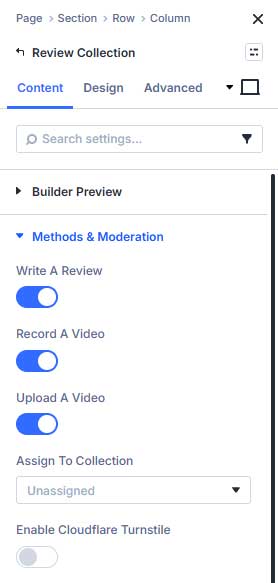
In the module’s Content tab, open Methods & Moderation.
Choose which submission methods visitors can use:
- Write a Review: Submit a written review.
- Record a Video: Record a video using their camera and microphone.
- Upload a Video: Submit an existing video file.
Keep at least one method enabled.
Video recording requires an HTTPS page, a supported browser, and permission to use the visitor’s camera and microphone.
Assign reviews to a collection
Use Assign to Collection to automatically group submissions into an existing review collection.
Leave it set to Unassigned if you do not want to assign a collection.
Step 4: Choose your form fields
Under Content → Fields, configure the information you want to collect.
For configurable fields, choose:
- Required: The visitor must complete the field.
- Optional: The visitor can leave it empty.
- Hidden: The field does not appear.
Available fields include the reviewer’s name, rating, company, review titles, images and profile picture.
Written review text is required when a visitor chooses Write a Review. If you make ratings optional or hide them, submissions without a rating remain unrated and do not contribute to rating averages.
Step 5: Configure uploads and messages
Under Upload & Recording Limits, set your image size, video file size and video duration limits.
Your hosting provider’s upload restrictions may impose a lower limit.
Use Step Content, Labels & Navigation, and Messages to customize the form’s instructions, buttons and feedback.
Under After Submission, choose either:
- Show Thank You Message
- Redirect to Page
For a redirect, select a published destination page.
Step 6: Style the form
Open the Design tab to adjust the layout, typography, fields, buttons, rating stars and spacing.
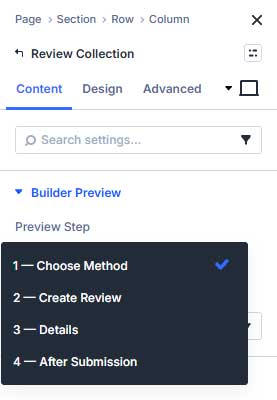
Use Content → Builder Preview to view different form steps and methods while designing. These controls change the builder preview, not the visitor’s submission.
Step 7: Publish and test
Save and publish the page, then exit the Visual Builder.
Open the published page and submit a test review. Check that the enabled methods, required fields and submission confirmation work as expected.
Go to Reviews in your WordPress dashboard to find the submission under Pending.
Review its content, make any necessary edits, then publish it when you are ready for it to appear in your review displays.
Optional spam protection
You can enable Cloudflare Turnstile under Methods & Moderation after configuring its keys in the plugin’s Collection Protection settings.
See the Collection Protection guide for setup instructions.